
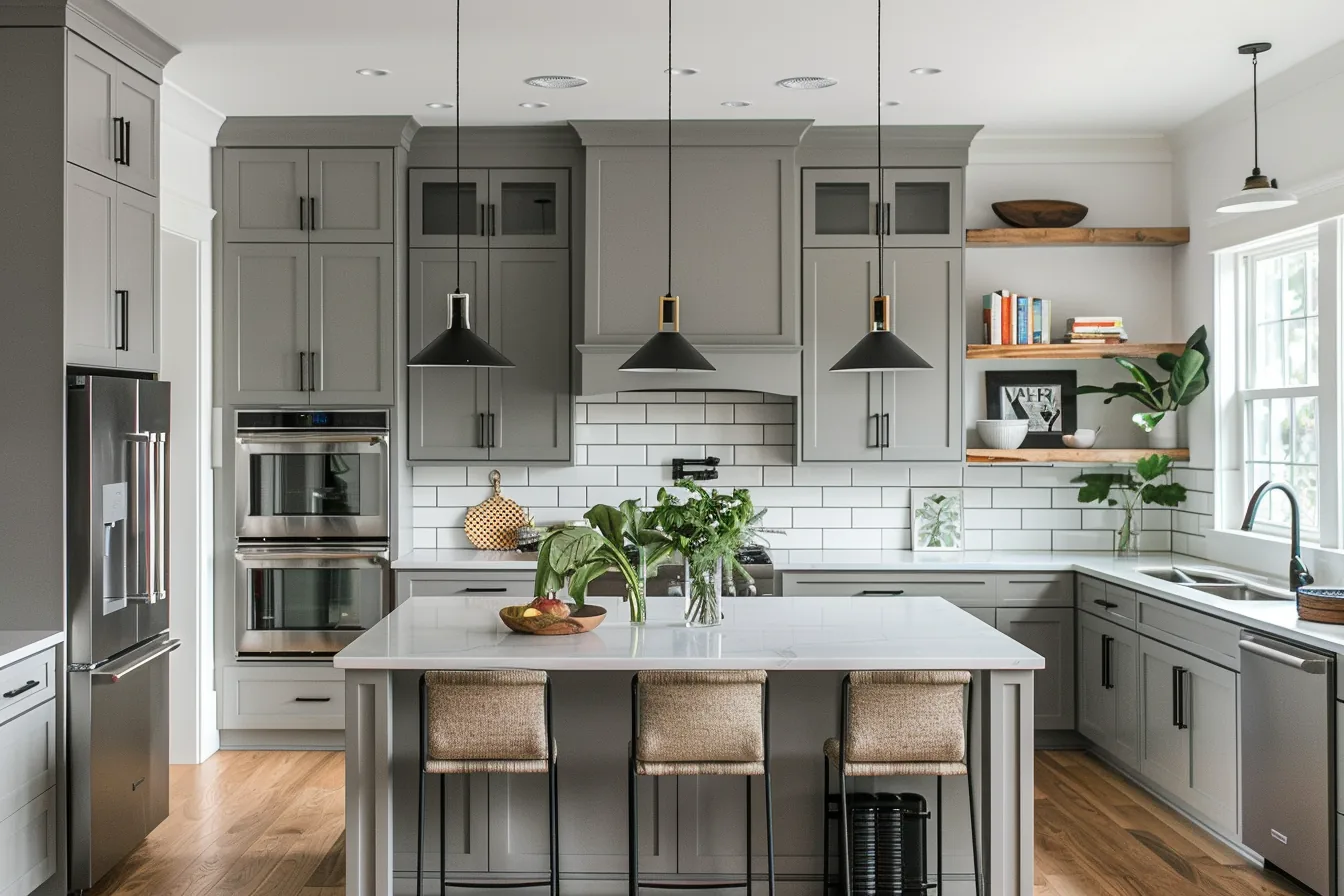
Grey sits in an awkward place on a villa schedule. It is not the feature colour a designer wants to argue for, and it is not the safe white a builder defaults to. Yet across kitchen layouts we see repeatedly, grey shaker cabinetry ends up doing the quiet structural work: anchoring an open-plan ground floor, carrying stone and timber tones through the butler's pantry, and still reading correct ten years later when the villa is resold. If you are specifying cabinets for a villa — whether as the owner, the architect or the procurement lead on a turnkey package — here is how to judge grey shaker cabinetry properly, and what to lock down before anything goes into production.
Why grey shaker cabinetry keeps winning villa kitchens
The shaker door survives because it is honest construction: a flat centre panel framed by four rails and stiles, with a shallow rebate rather than carved ornament. That simplicity means the shadow line does most of the visual work, so the door reads crisp at a distance and calm up close. Pair it with grey and you get a neutral that has temperature — cooler than beige, softer than black — which is exactly what a villa kitchen needs when it is visible from the living room, the terrace and the stairwell at once.
Two practical reasons keep it on villa schedules. First, grey hides the marks a family kitchen actually collects: water spots near the sink, fingerprints on the pantry bank, the dust that settles in a home that spends half the year with doors open to the garden. Second, it does not fight the rest of the material palette. A villa kitchen typically has to sit beside stone benchtops, timber floors, brass or nickel tapware and often a dark feature wall. Grey shaker fronts accept all of those instead of competing with them.
Start with the grey, not the door
"Grey" is not one colour; it is a family that behaves very differently under villa lighting. Before you commit to a door style, settle the tone:
- Light grey opens up a galley or a kitchen with limited window area, and works well in a two-tone scheme where the tall bank is lighter than the island.
- Mid grey is the most forgiving across daylight and artificial light, and the easiest to keep consistent between an island, wall units and a scullery run.
- Charcoal and dark grey give weight to a large kitchen or a butler's pantry, but show dust and water marks more readily and need deliberate lighting design.
- Warm versus cool undertone matters more than lightness. A cool grey next to warm timber flooring looks muddy; a warm greige next to white marble can look yellowed.
Judge the tone against the actual finishes in the project, not on a screen. Our Grey Shaker Cabinets sit inside a shaker kitchen cabinets collection where finish, layout and dimensions are specified per project, so the grey you approve is the grey made for your space — not a fixed stock colour you have to compromise around.
Match the door profile to the villa's architecture
Once the tone is set, the door profile decides how period-correct the kitchen reads. Within the shaker family we supply several distinct looks, and choosing between them is an architectural decision rather than a taste one:
| Villa situation | Door direction that usually works |
|---|---|
| New-build or renovated modern villa, open-plan living, minimal mouldings | Clean shaker with a narrow frame; consider grey matte cabinets for a flatter, quieter surface |
| Traditional or heritage-feel home with cornices and panelled doors | A shaker with a deeper rebate, or a painted finish that reads like joinery rather than furniture |
| Kitchen where display matters — china, glassware, a coffee station | Glass front shaker cabinets to break up a long wall of doors |
| Dark kitchen with limited daylight, or a moody scullery | Dark tone shaker cabinets, paired with layered task lighting |
| Two-storey volume where a single colour feels flat | Two tone shaker cabinets — grey on one plane, a lighter tone on the other |
| A classic light grey kitchen with integrated appliances and lit display | Light grey shaker style kitchen cabinets with raised panel doors, warm LED niches and accent hardware |
For a villa project we would rather see the whole kitchen resolved in one family than mixed across three door styles. If you want the softer, more decorative end of the range — raised panels, glass display cabinets with warm LED lighting, integrated wine refrigeration and oven housings — that is a different specification conversation from a flat-front shaker, and it should be settled before drawings are issued.
Decide the build behind the paint
Grey shaker doors fail in two ways: the surface chips at the rail edges, or the panel telegraphs movement as seasons change. Both are decided by construction, not colour.
- Door construction. A framed door with a floating centre panel allows for humidity movement. Ask how the rail meets the stile — a machined joint with a proper paint primer at the joint line is what keeps the corner from lifting after a year of kitchen steam.
- Panel stability. Substrate and surface finish should be specified as a set. Board described as stable, wear-resistant and easy to maintain only performs that way when the finish system matches how the panel was prepared.
- Carcass, not just fronts. Box construction, edge treatment and back fixing determine whether a run stays square. This is where cheap cabinetry reveals itself — on the doors after six months.
- Hardware. Hinges, drawer slides, support legs and connecting brackets should be on the same order as the cabinets, matched to door weight and drawer depth. Specifying them separately is how villa kitchens end up with mismatched soft-close behaviour across the house.
Our custom built-in kitchen cabinets are supplied as complete systems — layout, sizes, door styles and surface finishes specified per project, with matching hinges, drawer slide rails, support legs and brackets available on request — which is how we keep a villa's cabinetry consistent from the main kitchen through the pantry, laundry and wet bar.
Get the measurements right before anything is cut
Villa kitchens are rarely rectangular, and that is where made-to-measure work earns its keep. Standard modules will force compromises you live with for twenty years: a filler strip nobody likes, an appliance that does not sit flush, a tall bank that stops short of the ceiling and collects dust.
- Confirm dimensions on site after flooring and ceiling finishes are in — not from architectural drawings alone.
- Set the appliance list early. Ovens, steamers, wine refrigeration and integrated refrigerators dictate carcass widths, ventilation gaps and door swings.
- Resolve the ceiling line. Full-height cabinetry to a raked or bulkheaded ceiling is a joinery detail that must be drawn, not improvised on site.
- Plan internal fitout at the same time as the layout — pull-out trays, deep pantry drawers, corner solutions and dividers are cheaper specified than retrofitted.
Coordinate the kitchen with the rest of the villa
The single biggest efficiency gain on a villa project is sourcing cabinetry as part of one package rather than as an isolated purchase. Kitchen cabinets, wardrobes, media units, sideboards and interior doors share substrates, veneers, paint colours and hardware. When they come from one manufacturer, the grey in your kitchen is the grey in your joinery, and the timber tone on your island matches the tone on your bedroom cabinetry.
That coordination runs through a defined workflow — consultation, design and planning, production, logistics, installation and after-sales. For an overseas villa build this matters more than it does domestically: freight consolidation, container loading, customs paperwork and door-to-door delivery all become simpler when the cabinetry travels with the furniture rather than on a separate order with separate timing.
A pre-production checklist
- Grey tone approved on a physical sample, viewed on site in day and artificial light
- Door profile agreed and consistent across the whole kitchen (and matched to joinery elsewhere if required)
- Site-verified dimensions after flooring and ceilings are complete
- Appliance schedule confirmed, with ventilation and door-swing clearances drawn
- Door construction, substrate and finish system specified together in writing
- Hardware — hinges, slides, legs, brackets — on the same order and matched to door weight
- Internal fitout resolved per cabinet, not left to the installer
- Delivery sequence, packaging and container loading agreed against the site programme
- Installation responsibility and snag inspection named before shipment
Talk to us about your kitchen joinery
If you are specifying grey shaker cabinetry for a villa — one kitchen, or the full joinery package across the house — send us the drawings and the material palette. We will come back with a specification: door profile, grey tone, substrate and finish system, hardware schedule and internal fitout, priced against your layout rather than against catalogue modules.
SANTERSON — furniture and building materials manufacturer, one-stop project supplier since 2008. Custom and OEM manufacturing, door-to-door logistics, installation and after-sales support.
Contact: PHILLIP | Phone / WhatsApp: +86-13928214007 | Email: santerson@qq.com | Enquiries answered within 24 hours (Mon–Sat, 8:00 AM–6:00 PM GMT+8)